Sunday, 27 December 2009

Vocoder Mod


So After seeing on a few websites (http://forum.whitearmor.net/lofiversion/index.php?t2425.html) that there was indeed a sort of 'chin' segment that runs behind the vocoder to the lip of the lid, I decided that I needed to fashion one.

I used aluminium mesh & P40 (see link in earlier blogs) to create the basic shape for this, and then after this had set I added P38 filler, smoother and tapered out the 'tube lines'.

This looks a little rough and may tidy this up a bit before painting, but I think it looks a lot better t hen when the bottom of the 'naf' fibreglass piece simply jutted out :D

Saturday, 26 December 2009

In comes the Vocoder!


OK so, the vocoder.


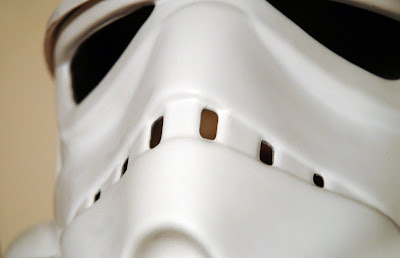
The vocoder was pretty poorly molded, and had absolutely no defintion whatsoever. It simply looked like a lump of fibreglass shaped roughly like a elongated clamshell.


I therefore 'dremeled' out the lines that separate the vertical bars and sanded them smooth/rounded, I also reinforced the rear of the piece with a good lump of fibreglass (P40 - see previous posts)


I then made the mother of all boo boos! I tried to aligned the piece perfectly vertical with the helmet resting on a flat service, forgetting that the original helmet was not symetrical, and this re-mold (Or whatever it is) was probably even worse.


When I picked up the helmet when the epoxy was set and looked, the vocoder was sitting 10-15 degrees off!

1 screwdriver for leverage and a simple cutting tool (Stanley knife) later and it was off. I then resanded the rear and reapplied, this time with acrylic resin to give me time to constantly re-align the piece.


This has come out pretty good, but as you can see from the pictures above (thanks http://www.starwarshelmets.com/), the vocoder on there curves away under the chin, whereas mine simply is a flat piece which juts out.... so today's task is to mold a piece of aluminium mesh, fibreglass, and fill to build this 'piece' up on my lid :D


After Epoxying the trimmed and 'routed' pieces together, I was left with 2cm gaps on either side of the helmet, between the back and front pieces, additionally to these I was also left with smaller holes & gaps on the rear of the helmet where the poorly formed top met the rear plate.


I therefore decided to use Davis P40 (Fibreglass) -


On top of aluminium mesh to bridge the gaps -

Then sanded smooth to await the painting.

As you can see above, this has indeed bridged the gaps and made the helmet look more like the finished article, however as the rear and the front plates are so badly misaligned, there is something of a step between them, which I have tried to merge with a curved gradient of filler (Sorry if I dont use all of the technically correct terms here), which looks good to be :D

NOTE: the crappy ears that came with this ket stick out about 1 cm around the oxygen tubes at the bottom of the helmet so I am contemplating buying a spare ABS set of these.... but these are quite expensive - £35 !! :o (Especially on a helmet I've already been stung on)

All thats left to do now is attach the vocoder and create the chin part, which is missing (Appears to be a trait of the FX helmets)

I'll post what I mean here later.


So.... I then proceeded, extremely carefully, with a borrowed 'dremel' or cheap gypsy version therein, to cut out the bucket's frown and eyes (NOTE: if you're going to do this on a cheap fibreglass bucket, use a set of goggles and mask - i got fibreglass in my eye and it kills, plus breathing in fibreglass is a bit of a no no: http://www.scif.com/safety/losscontrol/Article.asp?ArticleID=373 )
Anyhows, lesson learned.
I roughly cut out the teeth after researching a number of different 'stunt' helmets (www.starwarshelmets.com), and 'dremelled' out the eyes.
This being crappy fibreglass, I then had to painstakingly sand using ripped out small folded sheets of sandpaper the teeth and then work on the eyes for hours on end, until I got the look I was after (Albeit I may have sanded a little bit to much out of the corners of the eyes.... but it still looks good to me)

Friday, 25 December 2009

EBay Shot:


My bucket:


See fits together a bit better now ;)


Now to cut out teeth and eyes :D


As in my previous post, I said I needed to dremel out 'seams' and joins, as this wasn't done, and the parts didnt sit properly.
As you can see, above the face plates eye's I had to create the 'correct' line, 'dremelling' the fibreglass back to 2mm thick in a 1cm band.
I then had to do the same to the 'brow' to allow me to attach the 'seal' later on.
More to follow, inc cutting out eyes and teeth :D


Looking at the fitting together


Some top down shots of the gap between the front face plate and rear (Unglued)... i had to fit this together, however, due to the fibreglass not being molded correctly it didnt fit, so I have ahd to 'dremel' out a seam...

The 1st Post


Right then, my first ever blog and my first ever post. I decided to try and live out a childhood dream (kinda) I was always pretty 'into' my Star Wars, I remember watching the movies every christmas, and one of my favourite characters being the Stormtroopers.

Having recently had a baby, money was tight, so I went the ebay route in hunting out a bargin, and finally settled on the 'kit' above.


Foolishly, as it turned out, it wasnt a 'real' fan-made kit at all, rather a fibreglass 'soft', quite poorly molded kit, and require(s)(d) an immense amount of work on it to make it half way decent.

I therefore set about (with a borrowed Dremel or 2) cutting parts out and trimming sections, but more on that later. As you can see from the pictures above, I had, and still have my work cut out for me!
I'll post the next set later to show how I cut out the frown, and eyes :D !